一.介绍
虽然这个Railgun不像炮姐的电磁炮那么屌,但是在大部分情况下都能够提升一定的网站访问速度,特别是多次访问的速度。
当然,作为Cloudflare的秘密武器之一,这个也不是免费使用的,在两种途径下可以使用,一种当然是乖乖交钱选择付费套餐,还有一种就是成为Cloudflare的Optimized Partner,这个是在普通Partner的基础上另外签合约,来加入Cloudflare的Optimized计划,具体的建议自己去官网看,我懒得说了,主要多的权限就是这个Railgun。
![图片[1]-使用Docker部署Cloudflare Railgun-VPS SO](https://saas.bk-cdn.com/53ae0143-96c2-4461-a928-312cbd0bf729/image1584843120116.png)
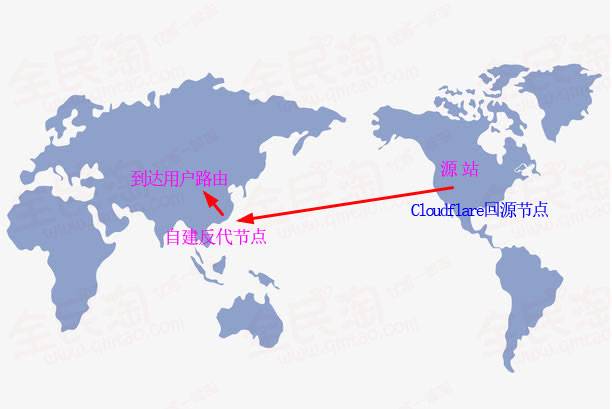
简单的来说,这个Railgun是在你的源站和CF的回源服务器之间再加一个Railgun服务器,由于Railgun可以配置的Keepalive时间较长,所以能够在连续访问的情况下与你的网站建立一个长连接,减少TTFB。并且由于Railgun支持对象缓存,所以能够将静态内容直接Hit而不是再次回源。在这两个措施下,Railgun能够视网站访问状况减少服务器压力并且提高一定的访问速度。
![图片[2]-使用Docker部署Cloudflare Railgun-VPS SO](https://saas.bk-cdn.com/53ae0143-96c2-4461-a928-312cbd0bf729/image1584843129665.png)
二.安装
还是有点用滴,所以我就折腾了一下,官方文档也有介绍,感兴趣的可以自己去翻翻
https://www.cloudflare.com/docs/railgun/
由于Railgun是CF自己的repo里的东西,而且会用到memcache,为了防止污染服务器环境(或者说是我懒得管了
所以我这次用Docker来部署,如果需要非Docker部署其实也很简单,可以看看官方安装教程 https://www.cloudflare.com/docs/railgun/installation.html
有些预备的东西要处理好,首先如果你的nginx配置了cloudflare的realip或者你的apache安装了mod_cloudflare模块,这儿你们需要在Cloudflare的IP列表那儿额外添加你的Railgun服务器的IP,如果和你的网站在一台服务器上的话请把你docker的ip段丢进去,如果是非docker安装你需要把127.0.0.1丢进去,具体怎么搞就不用我说了吧
另外如果你防火墙规则严的话把CF的IP给白名单了(针对2408端口的TCP),也可以用下面的命令来
#针对用ufw的Ubuntu啥的
for i in `curl https://www.cloudflare.com/ips-v4`; do ufw allow proto tcp from $i to any port 2408; done
#针对用iptables的CentOS,firewalld我不管了
for i in `curl https://www.cloudflare.com/ips-v4`; do iptables -I INPUT -p tcp -s $i --dport 2408 -j ACCEPT; done
现在开始安装,Docker怎么装就不用我提了吧,如果是CentOS6请翻我以前的文章,有介绍怎么安装较新版本的Docker
#本地准备一个存放配置文件和日志文件的文件夹,之后用于挂载
mkdir /etc/railgun /var/log/railgun/
#写入配置文件
cat >/etc/railgun/railgun.conf<<'EOF'
# rg-listener.conf
# This file provides the configuration for the local Railgun "listener" process.
#
# Note that Railgun requires memcached (https://memcached.org/) to be installed
# and (by default) listening on 127.0.0.1:11211 (the default memcached
# host:port).
# You should also increase the CACHESIZE set in memcached.conf from
# its default 64MB (very low) to at least 2048 (2GB). Further tuning should be
# done by consulting the memcached documentation around the STAT command.

# Activation details
#
# Website Owners: activation.token can be found at
# https://www.cloudflare.com/a/account/my-account
#
# CloudFlare Hosting Partners: activation.token can be found at
# https://partners.cloudflare.com
#
# Set activation.railgun_host to the external IP (recommended), or a hostname that
# resolves to the external IP, of your Railgun instance. Note that the hostname
# will not be re-resolved unless Railgun is restarted.
# 激活密钥,请去 https://partners.cloudflare.com/railguns 添加Railgun,然后会给你
activation.token =
# 填你Railgun服务器的外网IP
activation.railgun_host =

# Port to listen on (should not need to change).
wan.port = 2408

# Static map of IPs for use in NAT environments
# NAT下映射IP,当然我是不太建议用NAT的机器搞这个的其实
map.file = /etc/railgun/railgun-nat.conf
stderr.file = /var/log/railgun/panic.log
pid.file = /var/run/railgun/railgun.pid

# Log only errors by default
#
# 0 - log only errors
# 5 - full debug logging (not for production use)
# 日志等级
log.level = 0

# Disable origin server SSL certificate validation by
# default. This is done to prevent potential errors for
# Railgun instances that don't have the needed origin
# server certificates installed
# 忽略源站证书错误
validate.cert = 0

# CA Bundles
# Railgun includes its own certificate authority bundle for
# common certificate providers. Comment ca.bundle out
# to use the default openssl bundle provided with the OS
# CA证书
ca.bundle = /etc/pki/tls/certs/railgun-ca-certs.crt

# Memcached pools
#
# Use of a socket is recommended for best performance
# if your memcached does not require network connectivity
#
# Multiple memcached servers (host:port format) can be separated
# with a space
# 在Docker下这么来,这儿memcached是你下面创建docker时link的memcached机器的名字,如果是本机安装或者其他啥情况可以填IP
memcached.servers = memcached:11211
# 本机安装的情况下为了性能可以使用unix sock来连接,默认memcached是关闭这个的,需要的自己修改默认配置开启
#memcached.servers = /var/run/memcached/memcached.sock

# Timeout for memcached lookup responses in milliseconds
# Increase this value if memcached I/O timeouts are occurring
# in the Railgun logs
# memcached连接超时
memcached.timeout = 100

# The maximum size (in bytes) of an item that will be stored
# in memcached. Default to 1000000.
# memcached最大缓存文件大小
memcached.limit = 1000000

# The expiration time of individual memcached items in seconds.
# The default is 600 seconds (10 minutes). If set to 0 then
# the expiration time is infinite.
# memcached缓存内容过期时间
memcached.expiration = 600

# If the HTTP response body is greater than this number of bytes it will not be
# delta compressed and the body will be streamed across the WAN as it is read
# from the HTTP server. Defaults to 250000 bytes.
#
# Note that increasing this beyond 250KB will allow Railgun to consume more CPU
# resources per request. Text (HTML, CSS, JavaScript, JSON) files over 250KB
# should be rare, and if there is a need to increase stream.size substantially,
# you should be aware of the diminishing returns.
# stream.size = 250000

# Statistics reporting
#
# Railgun provides key metrics by JSON over HTTP, syslog, and/or
# POSTs to a URL
#
# Set to 1 to enable statistics gathering and reporting
# 日志收集
stats.enabled = 0

# Sets the URL (e.g. http://stats.example.com:9090/) to POST to.
# Defaults to nothing indicating that stats will not be POSTed anywhere
# POST上传日志的地址
# stats.url = http://localhost:9090

# Determines whether stats are periodically written to the log file.
# Set to 1 to enable
# 是否将日志写入文件
stats.log = 0

# How often (in minutes) stats are generated (and logged and
# POSTed to the stats.url)
# 日志更新周期
stats.interval = 1

# host:port on which to listen and create a simple HTTP API through
# which stats can be read
# 日志查看API监听地址
stats.listen = 127.0.0.1:24088
EOF

#创建并运行Docker
docker run --name railgun-memcached -d --restart=always memcached:latest
docker run -d --name=cf-railgun -p 2408:2408 -v /etc/railgun:/etc/railgun -v /var/log/railgun:/var/log/railgun --link railgun-memcached:memcached --restart=always senra-cf-railgun
需要注意的是,你首先需要在Partner面板上添加Railgun来获取激活密钥,然后会进入pending状态,在你配置完机器上的Railgun并启动后,如果启动成功面板上会进入Active状态
当然,这时候你还是不能用的,如果你需要对属于你的partner账户下的域名分配Railgun,你需要在后台自己指定,有一点需要知道,那就是一个域名只能启用一个,所以请注意好Railgun的部署位置以及域名的最大受众位置和源站位置这三点